使用该拍照方法 相机无需连接触发信号线 只需要camera link线就可以实现standard拍照模式
1.相机设置
触发模式设置为 Standard
Exposure设置为 Pulse Width
Source设置为 CC1
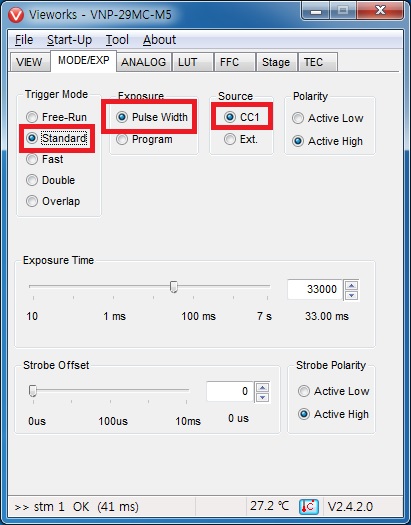
2.DCF配置文件
Continuous_VN-29M5(80MHz)_10bit_12bit_2tap_Top_Bottom_CC1TriggerEvent

使用该拍照方法 相机无需连接触发信号线 只需要camera link线就可以实现standard拍照模式
1.相机设置
触发模式设置为 Standard
Exposure设置为 Pulse Width
Source设置为 CC1
2.DCF配置文件
Continuous_VN-29M5(80MHz)_10bit_12bit_2tap_Top_Bottom_CC1TriggerEvent

tensorflow在1.3后加入了官方的windows支持,可以使用cmake在vs2015下编译c++ library。但坑还是很多,简单整理了1.3版本编译及使用过程。并介绍了编译部分kernel的方法。其他版本也可参考进行编译。
编译版本为1.3,只cpu。带gpu的tensorflow可以用1.5以后的版本。
编译前准备
组件下载或安装
1.CMake version 3.5以上
2.git (http://git-scm.com)
3.swig (http://www.swig.org/download.html)
4.Visual Studio 2015
5.Python 3.5 64-bit (选择添加安装lib文件)
6.NumPy 1.11.0 以上
注意事项:CMake 与 git安装时需要将其加入到环境变量中,否则后续编译过程中会出现找不到相关程序的错误
编译过程
1.设置vs使用64位的编译工具(否者有一定概率报out-of-memory的错误)

1.添加源
rpm -ivh http://dl.fedoraproject.org/pub/epel/7/x86_64/e/epel-release-7-10.noarch.rpm
2.安装proftpd
yum install proftpd proftpd-mysql proftpd-utils
3.安装mysql 略
1.安装epel源
yum install epel-release
2.安装nginx
yum install nginx
3.add php7 repository
rpm -Uvh https://mirror.webtatic.com/yum/e17/webtatic-release.rpm
4.安装php7
根据需要添加删除
yum install php70w-fpm php70w-cli php70w-gd php70w-mcrypt php70w-mysql php70w-pear php70w-xml php70w-mbstring php70w-pdo php70w-json php70w-pecl-apcu php70w-pecl-apcu-devel
5配置PHP7
vi /etc/php-fpm.d/www.conf
修改
user = nginx
group = nginx
设置session
mkdir -p /var/lib/php/session
chown nginx:nginx -R /var/lib/php/session/
设置自动启动
sudo systemctl start php-fpm
sudo systemctl start nginx
sudo systemctl enable php-fpm
sudo systemctl enable nginx
6.安装MariaDB
yum install mariadb mariadb-server
自启动&配置
systemctl start mariadb
systemctl enable mariadb
mysql_secure_installation
7.配置nginx
vi /etc/nginx/conf.d/default.conf
添加
server {
    listen       80;
    server_name  server_domain_name_or_IP;

    # note that these lines are originally from the "location /" block
    root   /usr/share/nginx/html;
    index index.php index.html index.htm;

    location / {
        try_files $uri $uri/ =404;
    }
    error_page 404 /404.html;
    error_page 500 502 503 504 /50x.html;
    location = /50x.html {
        root /usr/share/nginx/html;
    }

    location ~ \.php$ {
        try_files $uri =404;
        #fastcgi_pass unix:/var/run/php-fpm/php-fpm.sock;
        fastcgi_pass 127.0.0.1:9000;
        fastcgi_index index.php;
        fastcgi_param SCRIPT_FILENAME $document_root$fastcgi_script_name;
        include fastcgi_params;
    }
}
测试
一.数据类型
MIL_ID: MIL标准的实例化类型
MIL_INT:整数类型,可以转化未INT类型使用。但使用MIL库函数时,必须使用MIL_INT,不要用INT代替。部分情况下会计算错误
MIL_DOUBLE:类似同上
二.典型函数举例
1.实例化系统环境
MIL_ID MilApplication,MilSystem;
/* Allocate a MIL application. */
MappAlloc(M_NULL, M_DEFAULT, &MilApplication);
/* Allocate a MIL system. */
MsysAlloc(M_DEFAULT, M_SYSTEM_HOST, M_DEFAULT, M_DEFAULT, &MilSystem);
2.载入/保存图片
MIL_ID MilImage;
MbufRestore(filename.toUtf8().data(), MilSystem,&MilImage);//读取图片
MbufExport(temps.toUtf8().data(),M_PNG,MilImage);//保存成PNG
3.获取图片信息
MIL_INT SrcImageSizeX = 0;
MIL_INT SrcImageSizeY = 0;
MIL_INT SrcImageType = 0;
void* SrcImageDataPtr = M_NULL;
MIL_INT SrcImagePitchByte = 0;
MIL_INT SrcImageDataSize = 0;
MbufInquire(MilImage, M_SIZE_X, &SrcImageSizeX);//宽
MbufInquire(MilImage, M_SIZE_Y, &SrcImageSizeY);//高
MbufInquire(MilImage, M_TYPE, &SrcImageType);//图片类型
MbufInquire(MilImage, M_HOST_ADDRESS, &SrcImageDataPtr);//数据指针
MbufInquire(MilImage, M_PITCH_BYTE, &SrcImagePitchByte);//PitchByte
MbufInquire(MilImage, M_SIZE_BYTE, &SrcImageDataSize);//DataSize
4.获取图片最大最小值
MimAllocResult(MilSystem, M_DEFAULT, M_STAT_LIST, &MilExtreme);
MimStat(MilImage, MilExtreme, M_MAX + M_MIN, M_NULL, M_NULL, M_NULL);//设置要获取值的类型
double max = 0;
double min = 0;
MimGetResult(MilExtreme, M_MAX + M_TYPE_DOUBLE, &max);
MimGetResult(MilExtreme, M_MIN + M_TYPE_DOUBLE, &min);
5.简单计算
MimArith(MilImage, -min, MilImage, M_ADD_CONST);//加一个常数
MimArith(MilImage, scale, MilImage, M_MULT_CONST);//乘一个常数
6.边缘检测
MIL_ID MilEdgeContext,MilEdgeResult;
MedgeAlloc(MilSystem, M_CONTOUR, M_DEFAULT, &MilEdgeContext);
MedgeAllocResult(MilSystem, M_DEFAULT, &MilEdgeResult);
MedgeControl(MilEdgeContext, M_CENTER_OF_GRAVITY, M_ENABLE);//启用计录轮廓位置
MedgeControl(MilEdgeContext, M_AVERAGE_STRENGTH+M_SORT1_DOWN, M_ENABLE);//计算平均强度,并设置排序方式
MedgeControl(MilEdgeContext, M_THRESHOLD_MODE, M_USER_DEFINED);//启用自定义THRESHOLD_MODE
MedgeControl(MilEdgeContext, M_THRESHOLD_LOW, 50);//设置阀值
MedgeCalculate(MilEdgeContext, MilImage, M_NULL,M_NULL, M_NULL, MilEdgeResult,M_DEFAULT);//计算轮廓
MedgeGetResult(MilEdgeResult, M_DEFAULT, M_NUMBER_OF_CHAINS+M_TYPE_MIL_INT,&NumEdgeFound, M_NULL);//获取轮廓数量
MedgeGetResult(MilEdgeResult, n, M_CENTER_OF_GRAVITY +M_TYPE_MIL_INT,
&CENTER_OF_GRAVITY_x, &CENTER_OF_GRAVITY_y);//获取特定轮廓的位置
一。使用到的程序
nginx
php7.0
mysql
FreshRss
二 安装步骤
php7.0安装
1.编辑安装源
$ sudo vi /etc/apt/sources.list
在默认源下添加
deb http://mirrordirector.raspbian.org/raspbian/ stretch main contrib non-free rpi
2.设置默认从jessie 安装 新软件从 stretch安装
$ sudo vi apt/preferences
添加
Package: *
Pin: release n=jessie
Pin-Priority: 600
3.安装
sudo apt-get update
udo apt-get install –t stretch php7.0 php7.0-curl php7.0-gd php7.0-fpm php7.0-cli php7.0-opcache php7.0-mbstring php7.0–xml php7.0-zip
4.设置
sudo vi php/7.0pool.d/www.conf
确认
user = www-data
group = www-data
nginx/mysql安装 略
配置
1.注意nginx的运行账户与php-frm一致
2.nignx php设置
location ~ \.php$ {
# Choose either a socket or TCP/IP address
fastcgi_pass unix:/var/run/php/php7.0-fpm.sock;
# fastcgi_pass 127.0.0.1:9000;
fastcgi_split_path_info ^(.+\.php)(/.+)$;
fastcgi_index index.php;
include fastcgi_params;
fastcgi_param SCRIPT_FILENAME $document_root/$fastcgi_script_name;
}
3.新建一个数据库给FreshRss使用
FreshRss安装
1.下载源
cd /var/www
sudo git clone https://github.com/FreshRSS/FreshRSS.git
2.修改权限
sudo chown -R www-data:www-data /var/www/freshrss
3.浏览器进入主目录,根据提示设置就可以了
1.关闭SELinux
vi /etc/selinux/config
将SELINUX=enforcing 改为SELINUX=disabled(需重启机器)
2.安装samba
yum install samba samba-client
3.配置共享访问
编辑 /etc/samba/smb.conf
在[global]中添加:
security = user
map to guest = Bad User
#允许guest用户
guest account = administrator
#guest映射为系统某一账户
4.配置共享文件夹
[RDP]
comment = RDP_Defect
path = /home/administrator/RDP_Defect
valid users = administrator
writable = yes
available = yes
public = yes
case sensitive = auto
preserve case = Yes
short preserve case = Yes#设置可以修改的账户(global中的账户),并设置大小写不敏感
5.设置启动
启动 systemctl start smb
开机启动 systemctl enable smb
参考文章 http://www.itzgeek.com/how-tos/linux/centos-how-tos/install-xrdp-on-centos-7-rhel-7.html
1.安装CentOS7的桌面环境 install Gnome on CentOS 7(Gnome)
2.Install EPEL and nux Desktop repository rpms.
rpm -ivh https://dl.fedoraproject.org/pub/epel/7/x86_64/e/epel-release-7-8.noarch.rpm
rpm -ivh http://li.nux.ro/download/nux/dextop/el7/x86_64/nux-dextop-release-0-5.el7.nux.noarch.rpm
具体的源文件新版本号可以在网站列表中找到
3.安装
yum -y install xrdp tigervnc-server
执行前可以先执行一下 yum update
4.安装Keyboard
教程是Japanese的,可以根据实际修改
cd /etc/xrdp
wget http://www.mail-archive.com/xrdp-devel@lists.sourceforge.net/msg00263/km-e0010411.ini
cp km-e0010411.ini km-0411.ini
cp km-e0010411.ini km-e0200411.ini
cp km-e0010411.ini km-e0210411.ini
5.启动
systemctl start xrdp.service
6.设置防火墙
防火墙打开3389/tcp端口
7.设置自启动
systemctl enable xrdp.service
1.在etc/yum.conf 添加
proxy=http://192.168.1.10:8088/
2.如果代理环境中有证书,回导致源更新失败,可以继续添加
sslverify=false
参考链接
http://www.ronnutter.com/raspberry-pi-ntp-client-setup/
http://www.cnblogs.com/mybook/archive/2012/11/06/2757597.html
一.
Option 1 – sudo raspi-config, select change_timezone
Option 2 – sudo dpkg-reconfigure tzdata, Select the right country/timezone
使用上述方法可以设置时区
二.
pi@raspberrypi:~$ date
Sun Feb 24 14:38:41 CST 2013
使用上述方法查看当前时间
三.
pi@raspberrypi:~$ ntpq -p
remote refid st t when poll reach delay offset jitter
==============================================================================
*192.168.1.20 LOCAL(0) 13 u 8 64 3 0.304 1.632 1.407
使用上述方法查看当前ntp连接状态
四.
/etc/ntp.conf
文件中设置了ntp服务器的地址
# pool.ntp.org maps to about 1000 low-stratum NTP servers. Your server will
# pick a different set every time it starts up. Please consider joining the
# pool:
server 0.debian.pool.ntp.org iburst
server 1.debian.pool.ntp.org iburst
server 2.debian.pool.ntp.org iburst
server 3.debian.pool.ntp.org iburst
局域网添加IP地址
五.
windows安装ntp-4.2.8p8-win32-setup.exe https://www.meinbergglobal.com/english/sw/ntp.htm
六.
局域网使用LOCAL时间设置方法如下

七.
Edit NTP Configuration
# restrict default noquery nopeer nomodify notrap
restrict default limited kod nomodify notrap nopeer noquery
# restrict -6 default noquery nopeer nomodify notrap
restrict -6 default limited kod nomodify notrap nopeer noquery
后重启ntp
符:
NTP:ntpq -p参数解释
remote:NTP主机的IP或者是主机名(ntp.conf文件中配置的server和peer主机)
如果有『 * 』代表目前正在作用当中的上层 NTP
如果是『 + 』代表也有连上线,而且可作为下一个提供时间更新的候选者。
refid:参考的上一层 NTP 主机的地址
st:st的值表示的是远程主机的层级(NTP采用分层同步方式,一般第n+1级与第n级时钟源进行同步。NTP最多支持16层同步,即0-15层。多于16层将无法同步。
如果远程主机是当前主机的NTP Server的话,一般情况下本级主机的层级是st+1)。
t:The type of the peer (local, unicast, multicast or broadcast) when the last packet was received
l local (such as a GPS clock)
u unicast (this is the common type) (单播,即NTP client向NTP server发送NTP请求,NTP server回复的模式)
m multicast (多播,可跨子网。)
b broadcast (广播,不可跨子网。NTP server定时向广播地址发送NTP包,NTP client通过广播地址获取NTP包,同步本地时钟)
– netaddr (usually 0) when:自上次时钟同步以来经过了多少秒(当when=poll时,进行一次时钟同步,同时when被清零,从头开始计时。通过when可以知道上一次同步时间
(当前时间- when)和下一次同步时间(当前时间+poll-when))
pool:时钟同步间隔(ntp服务刚启动时,缺省的最小同步间隔是64(minpoll=6)秒,然后依次增加,128, 256, ……, 1024。缺省的最大值是1024(maxpoll=10)秒。
这两个值分别可以通过minpoll和maxpoll参数修改。)
reach:八进制数,表示最近8次时钟同步包接收情况(1表示接收成功,0表示接收失败。每接收一个包左移一位。对于一个运行较长时间的NTP client而言,
这个值应该是377->11,111,111,即最近8次包接收均成功;否则表示有丢包情况发生)
NTP刚启动后Reach变化:
如果最近的一次包接受失败:
delay:表示NTP client从发出NTP请求到接收到NTP服务器回复所经过的时间(毫秒)。
offset:即NTP client的本地时间与NTP服务器时间的差异。也就是NTP client需要调整的时间差异。
disp:表示两次时钟同步之间的offset的差值。
Jitter:Linux 系统时间与 BIOS 硬件时间的差异时间(毫秒)。